Most back pain on the trail has nothing to do with how far you walk. It comes from loading a camping backpack the wrong way and then wondering why your shoulders are wrecked by mile two. The instinct is to cram the heaviest stuff to the bottom to keep it out of the way. That feels logical until you realize it turns your pack into a pendulum that pulls you backward with every step.
The fix is not buying a bigger pack. A 50L camping backpack loaded with the weight-zone method carries cleaner than a 70L loaded wrong. I have done both. I know which one I reach for now. This guide walks through the exact load order I use on every trip, from the sleep system in the bottom to the rain cover clipped to the outside. Get this right once and you stop thinking about your back and start thinking about the trail.
Before the method matters, the pack does: the Loowoko 50L has the compartments for this to work
You need a main compartment with enough depth to zone your gear, a hip belt that actually transfers load, and a rain cover that does not blow off in a crosswind. The Loowoko 50L checks all three and costs less than most single-night lodging.
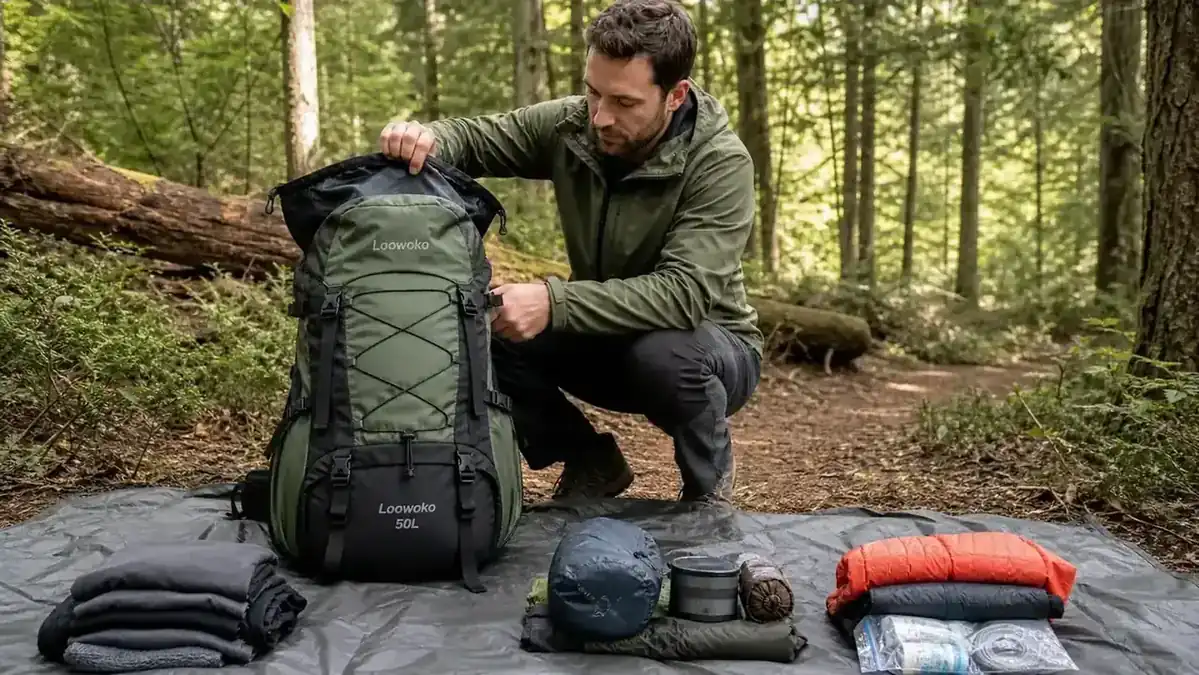
Amazon Check Today's Price on Amazon →Step 1: Empty Everything Out and Sort into Zones Before You Touch the Pack
Do not load as you pack. That is where overweight shoulder loads start. Lay everything on the floor or a tarp in three groups: heavy items (tent body, bear canister, water filter, food bag, stove), bulky-but-light items (sleeping bag, sleeping pad if it is internal, puffy jacket), and small-and-accessible items (rain jacket, headlamp, snacks, first aid, navigation). A fourth group holds everything that clips or straps to the exterior.
The sorting step takes three minutes and saves you from repacking at the trailhead because you realized your tent is buried under your sleeping bag and you need to stake out tonight. Sort first, load second. That sequence is non-negotiable if you want the zones to work.
Step 2: Load the Bottom Zone with Your Sleep System
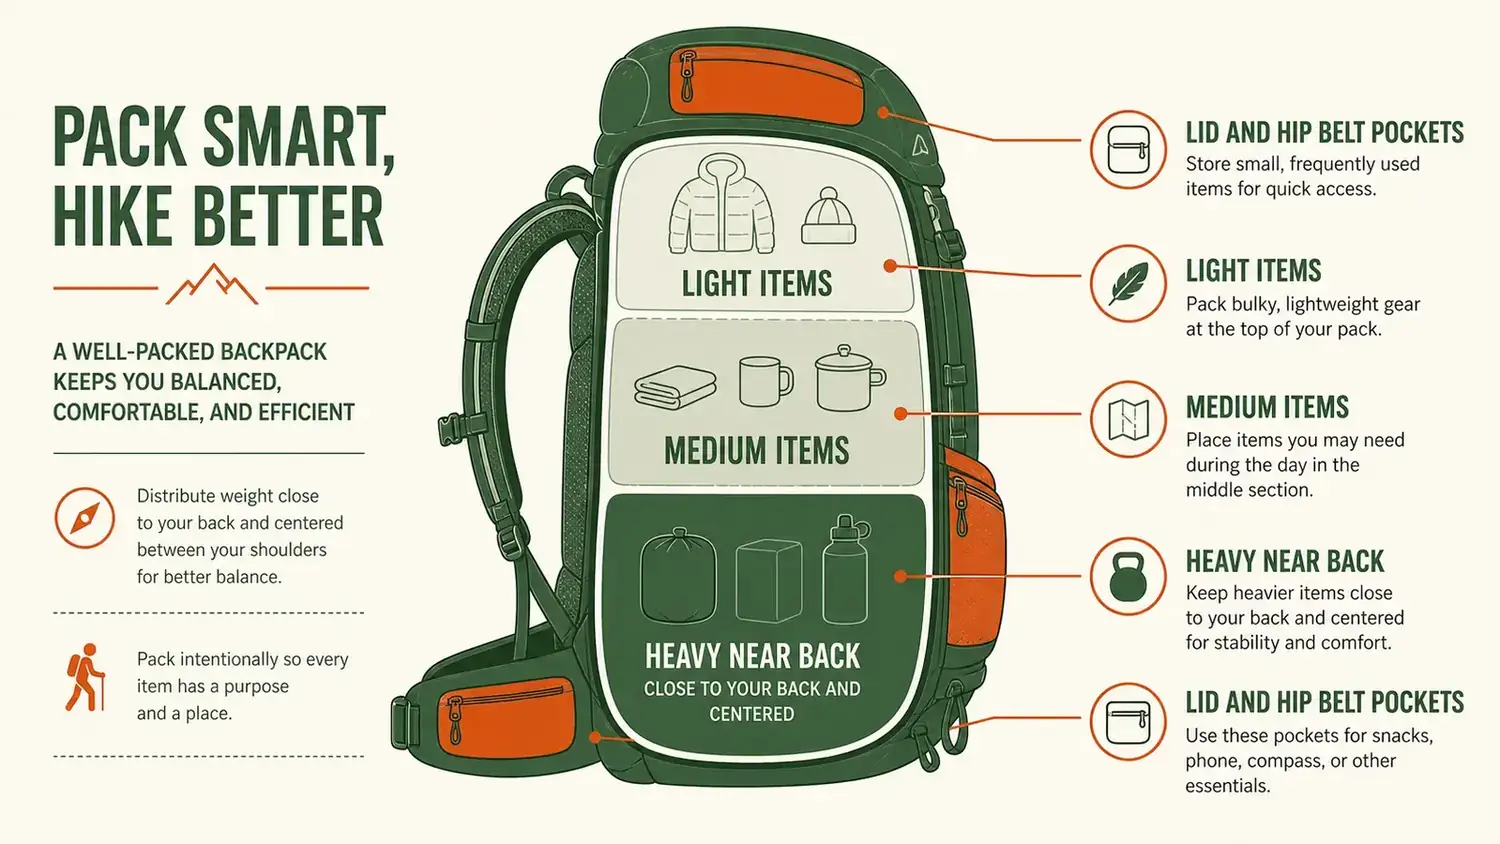
The bottom third of the main compartment is the bottom zone. This is where the sleeping bag goes, always. Stuff-sack it tight or compress it in a dry bag, then drop it straight to the bottom. If you are car camping and carrying a full-size sleeping pad that rolls internally, that goes in here too, along with any camp shoes or flip-flops you will not need until you reach camp.
The bottom zone carries light, compressible gear because you want the weight to stay high and centered. Heavy stuff riding low pulls your pack away from your back and taxes your lower back with every step. Keep it soft, keep it light. The sleeping bag is perfect for this zone because it is bulky but weighs almost nothing.
If your pack has a separate bottom compartment accessed through a lower zipper, use it for the sleeping bag and leave the main compartment floor open. The Loowoko 50L has a main compartment that runs the full depth, so I lay the sleeping bag in a compressed dry bag at the bottom and work upward from there.
Step 3: Build the Core Zone with Your Heaviest Gear Centered Against Your Back
The core zone is the middle of the pack, pressed as close to your spine as possible. This is the most important zone and the one most people get wrong. Heavy gear belongs here: the tent body and fly (not the poles), your food bag, the camp stove, the bear canister if you are carrying one, and your full water capacity if you are starting dry.
The physics are simple. When the heaviest mass in the pack sits tight against your back and centered vertically, the load transfers cleanly through your torso and into your hips. When it sits out away from your back or rides low, your spine is doing the work instead of your skeleton. A properly loaded core zone is the difference between a 35-pound pack that feels like 25 and a 25-pound pack that feels like 40.
Heavy gear centered against your back transfers load into your hips. Heavy gear riding low or swinging out is why your lumbar screams by noon.
Pack the tent body against the back panel first, then stack the food bag or bear canister on top of it. If you are carrying a two-liter water bladder, that slides into the hydration sleeve on the back panel of the Loowoko 50L before you load anything else. The bladder slot keeps it pressed directly to your back, which is exactly where you want your heaviest liquid weight.
Step 4: Fill the Top Zone with Gear You Will Need Before Camp
The top zone covers everything from the middle of the pack up to the top opening. This layer gets your mid-weight gear that you may need during the day: insulation layers, spare dry socks, camp towel, cook kit, fuel canister. Nothing in the top zone should be heavy enough to tip the pack's balance point backward.
The key question for the top zone is: will I need this on the trail, or only at camp? If you will need it on the trail, it goes in the top zone so it comes out without digging. If you will only need it at camp, pack it toward the back of this zone. Your cook kit is a good example. You will not cook mid-hike, so it can go toward the back. Your wind shell, on the other hand, goes toward the front of the top zone because the weather will change.
The tent poles, if they are separate, pack vertically along the side of the main compartment. Do not lay them horizontally across the core zone. Poles running vertically stay stable; poles running horizontal turn into a rigid shelf that prevents gear from settling and makes the pack ride oddly. The Loowoko 50L has side compression straps that stabilize external poles, but internal vertical placement works better on rough terrain.
Step 5: Use the Top Lid and Hip Belt Pockets for Everything You Need in Ten Seconds
The top lid pocket and hip belt pockets are the most-used real estate on any camping backpack, and most people underload them. This is where the first-aid kit lives, the headlamp, snacks for the trail, your phone if you navigate by app, sunscreen, lip balm, and your trail permit or map. Anything you would otherwise stop and dig for.
The top lid pocket on the Loowoko 50L is generously sized but not bottomless. Resist the temptation to stuff it because that shifts weight away from your spine and degrades the pack's balance. One full day's worth of snacks, your navigation, headlamp, and first aid is about the right weight for the lid. The hip belt pockets handle phone and snacks you want truly instant access to without ever unshouldering the pack.
One practical note: put your rain jacket in the lid pocket last, on top of everything else. It is the single item that should be truly instant-access on a backcountry day. When a squall rolls in, you have about 90 seconds of warning, and you do not want to be unclipping buckles to find it.
Step 6: Strap the External Items and Clip the Rain Cover
External attachment is for gear that is too bulky or wet to go inside: trekking poles when you are not using them, a sleeping pad that will not fit internally, a wet rain shell you just pulled off, a wet tent body after breaking camp in the rain. The Loowoko 50L has lashing points on the front panel and compression straps on both sides for exactly this.
The rule for external gear is simple: nothing should swing. Everything strapped to the outside of the pack adds instability if it hangs loosely. Strap it flat and tight. A sleeping pad strapped vertically against the front panel and cinched with the compression straps is stable. The same pad lashed loosely and flopping around wrecks your balance on uneven terrain.
The rain cover is the last thing on before you start hiking, not an afterthought when you are already soaked. The Loowoko 50L includes an integrated rain cover that stores in a pocket on the bottom of the pack. Pull it out at the trailhead, give it a shake to confirm it is in good shape, and tuck it back in where you can grab it in under five seconds. In the Cascades I have never once regretted taking 20 seconds at the trailhead to confirm the rain cover was accessible. I have absolutely regretted assuming I would find it when I needed it.
What Else Helps: Fit Adjustment and Load Distribution
Packing order matters, but strap adjustment is what finishes the job. Once the pack is loaded, put it on and loosen all the straps fully. Cinch the hip belt first until the top of the belt sits just above your iliac crest, the bony prominence on your hips. Tighten it until the belt cups your hips firmly. Then cinch the shoulder straps until they contour without gaps, but leave them loose enough that you are not bearing the full load on your shoulders. The shoulders should feel like guides, not load bearers. Then pull the load lifter straps at the top of the shoulder harness to angle the pack in toward your back. Finally, clip and snug the sternum strap.
If you get this sequence right with a properly packed bag, 70 to 80 percent of the weight should ride on your hips, not your shoulders. Check it by lifting your shoulder straps slightly off your shoulders mid-hike. If the pack barely moves, your hip belt is doing its job. If the whole load drops, you need to cinch the belt more and re-adjust.
One more thing on pack volume: resist overfilling. A 50L pack loaded to 48 liters carries far better than a 65L pack loaded to 48 liters because the smaller pack keeps everything closer to your center of gravity. If you routinely have space left over, you either have the right pack for your kit or you are packing efficiently. Either outcome is fine. The problem is buying up in volume to solve a packing skills problem. More volume lets you carry more air and loose gear, which usually means a worse carry, not a better one.
If you want a detailed look at why 50 liters is the right size for most weekend trips before you commit to a specific pack, the breakdown is in the 50L sweet spot article. And if you are still evaluating whether the Loowoko 50L is the right pack for your kit before you apply any of this, the full field review is at the Loowoko 50L review.
You have the method. Now you need a pack with the compartments to use it.
The Loowoko 50L has a hydration sleeve for your water bladder against the back panel, compression straps to lock external gear, a top lid pocket for instant-access items, and an integrated rain cover that stows in the bottom pocket. Rated 4.5 stars across more than 5,600 reviews. Check current pricing before your next trip.
Amazon Check Today's Price on Amazon →